
MAMP is a great development tool for developing locally your web projects. By default, when installing MAMP you have to access your projects in your browser at http://localhost:8888.
While this is fine and you can just create folders for each project you’re working on, it might make more sense to setup your projects similar to a real world environment. For example the real website might be mywebsite.com.
So when developing locally, we can setup MAMP to have each of your project using a .test TLD. Instead of mywebsite.com it would be mywebsite.test.
There are 2 things that need to be done. The first part you only need to do once, the second part you’ll have to do for each project you want with a custom development domain.
Here’s how to do this:
Part 1 (only do this once)
Download and Install MAMP here: https://www.mamp.info/en/downloads/
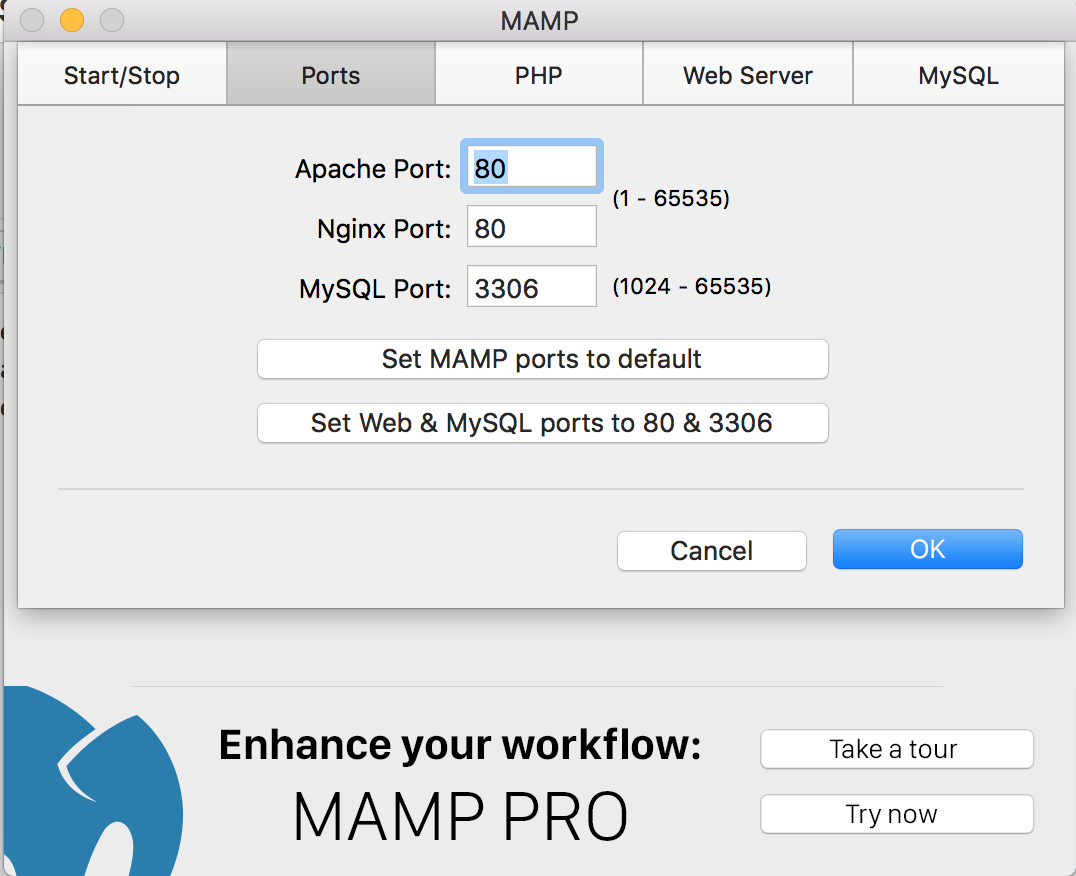
Once installed, open MAMP, then select Preferences. Select [Set Web & MySQL ports to 80 & 3306].
Next we need to configure MAMP to use Virtual Hosts.
Within your MAMP installation (often found in the Applications folder), open up this file:
/Applications/MAMP/conf/apache/httpd.conf
Look for these lines of code:
# Virtual hosts
# Include /Applications/MAMP/conf/apache/extra/httpd-vhosts.conf
Uncomment out the “Include” line by removing the #. So it should look like this:
# Virtual hosts
Include /Applications/MAMP/conf/apache/extra/httpd-vhosts.conf
We now have MAMP setup for Virtual Hosts.
Bonus Tip: If you need .htaccess support for each site, you’ll need to do one extra step.
In the httpd.conf file, look for the following:
<Directory />
    Options Indexes FollowSymLinks
    AllowOverride None
</Directory >
Change the AllowOverride None to AllowOverride All. It should look like this:
<Directory />
    Options Indexes FollowSymLinks
    AllowOverride All
</Directory >
That’s it for the initial setup! Onward to part 2…
Part 2 (for every project)
These next steps are repeated every you want to add, update, or delete a project that uses a custom .test TLD.
We need to modify two files for each project. Here’s how to do this:
File 1:
/Applications/MAMP/conf/apache/extra/httpd-vhosts.conf
Append to the bottom of this file the following:
<VirtualHost *:80>
    ServerName mywebsite.test
    DocumentRoot "/Users/amontalbano/git/mywebsite"
</VirtualHost>
You’ll need to update 2 things in here. First, the ServerName should be the URL that you’d like the local project’s site to be located at and second, the DocumentRoot is the root location of the files for your web project.
Save the file.
File 2:
Open up a terminal and type the following:
sudo nano /etc/hosts
(It may prompt you to type in your Mac’s password).
In this file we need to add the following line for our project:
127.0.0.1 mywebsite.test
Make sure the domain with TLD matches exactly to the ServerName you setup in the first file.
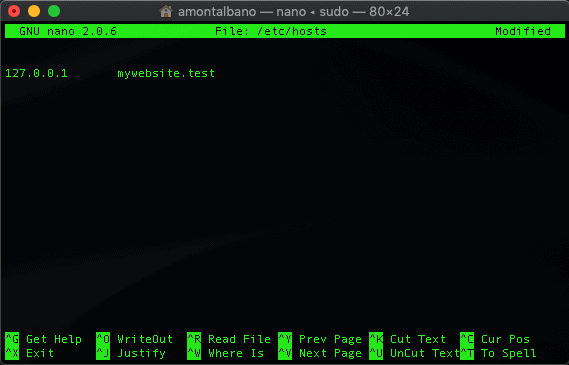
Press Control-X, then Y (for Yes), then Enter to save and close the file.
Finally, restart MAMP Servers (Stop Servers, then Start Servers).
Navigate in your browser to mywebsite.test and you’ll see your project in it’s own custom domain with the .test TLD!
Pro Tip: Technically you can use any custom TLD that you like, but I’d advise not use .local. Often Bonjour on a Mac will use this TLD and may cause conflicts with your MAMP projects. I use to use .dev, but since the TLD is owned by Google, I switched to .test, given this is a reserved TLD for localhost development.
Happy development!!

Anthony Montalbano
If it's worth doing, it's worth doing right.
Published on: February 18, 2017
Last modified on: December 8, 2021